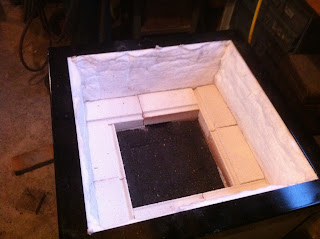
Following are some pictures of the build process of my furnace. It is based on a relatively common design used today in small glass shops. I owe a lot on this project to another good friend Art Seymour who blows glass in Nevada, he gave me the nudge to pursue this and has answered a lot questions along the way.
Here is where the furnace began with a mockup of 2600 degree firebrick around the crucible. This got me the size I needed for the frame. To this I added 1.5 inches of high temperature mineral fiber blanket and 1900 degree insulation board.
These are shots of the frame as I was welding it up out of angle iron. The brace in the lower picture is on the bottom to help carry the weight of the fire brick in the floor. While the brick is fairly light I still need to keep it in place. The floor is made of 1 inch of a castable refractory put in place to resist molten glass should the crucible crack, 3 inch 2300 degree firebrick and a layer of 1 inch 1900 board.
Top photo here shows the trimmer I made to trim the lip of the element groove I cut in the brick and the lower is of the stack of bricks ready to go into the furnace. I just scored the bricks with trimmer and snapped the lip off.
Here it is really starting to come together! The first couple of shots show the floor with the casting in place and the drain shoot out the back that I hope will save the floor should I ever lose a crucible. Molten glass is sort of like the ultimate solvent in that it can go through about anything including most ceramics and metals.
This series also show the elements going into place in the groove in the bricks and then exiting out near the one corner to be wired into the control circuit. I had some help winding the elements from AJ Coil. they are made from a pretty material called Kanthal A1 which is a high temp heating element material. This material can withstand temps to about 2400 degrees but we hope to keep things closer to 2000 so they will last longer. I am hoping to get a year or so out them before they have to be changed out.
Final picture shows it all closed up with a piece of M board filling in the top around the crucible. This is a special material that can withstand 2300 degrees of direct heat. Next will be the service lid and then the gather lid.
Here the frame for the service lid is coming together as I have it clamped up ready to be welded. Second shot shows the gather lid coming together as chip my trusty dog checks things out. The strange hinge geometry is to keep the hot surface of the lid directed downward when I open to gather glass away from me. This keeps the 2000 degree surface of the lid from radiating heat onto me which is a good thing.
Here we are finished up and ready to test this thing out! I made the control from various parts I bought on Ebay. It is a smart control with artificial intelligence so it can adjust to optimize the heating cycles for the best performance. It also has "Ramp" and "Soak" functions that allow it to be programmed to raise temperature at a given rate over a set time and then hold that temperature for another set period of time.
The green light that is on in the picture tells me the control has power while the red one that is not lit tells when the elements are hot. the hour meter keeps track of the time the elements are on so I can track their life in the furnace. There is a small safety switch that kills the heating circuit when you open the gather door because while glass as we use it in a frozen state does not readily conduct electricity in a liquid form it does. An undetected leak in the crucible could let glass get to an element and when you dipped the metal blowpipe into the glass you could get a shock without it.
Here it is during its test run, I opened it up for this picture when it was a little over 1600 degrees to give you an idea of what it will look like when you open it to gather glass. This has been a real interesting project and one of the more complicated things I have ever built. I am working on the annealer now and then the glory hole to reheat the glass in as you are working it. When those two are finished we will be all ready to start blowing glass!!!!


No comments:
Post a Comment